
How to get Hubspot first & latest touch UTM attribution
A contact may first arrive through paid search, then return through email or social before submitting another form. When the same UTM properties update each time, the latest campaign replaces the original one, and your first-touch context disappears.
To keep both views in HubSpot, use the main UTM properties for the latest captured values and create a second set of original-touch properties. A contact-based workflow copies the first available UTM values into those original fields once, while later submissions continue updating the main fields.
This guide explains how custom UTM attribution differs from HubSpot’s native source properties, how to build and test the workflow, and how to handle contacts that already have UTM data.
What first- and latest-touch UTM attribution means in HubSpot
HubSpot already has two properties called Original Traffic Source and Latest Traffic Source. It updates these automatically from known interactions, including website visits and marketing email clicks. The original property points to the earliest source HubSpot could identify, while the latest property can change as new sessions are recorded.
These are HubSpot-controlled source categories and drill-down fields. They are not the same as custom properties that store the raw values from utm_source, utm_medium, utm_campaign, utm_term, and utm_content.
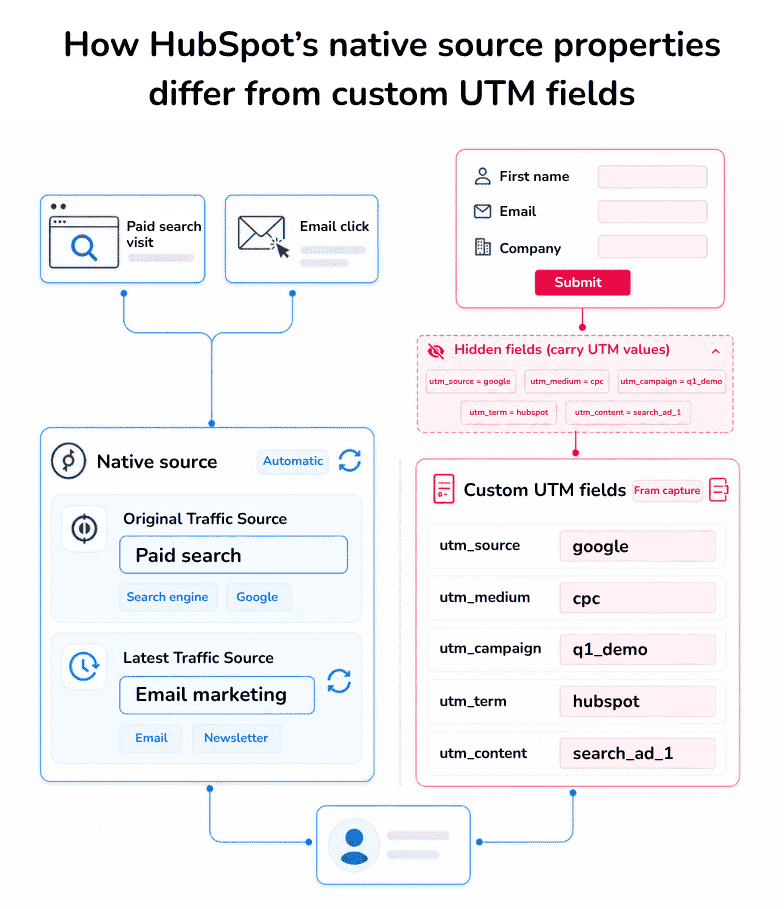
How HubSpot’s native source properties differ from custom UTM fields
In this setup, first touch means the first UTM values captured on the contact record, usually when someone submits a form. It may not be the visitor’s first anonymous interaction with the website.
That difference matters because HubSpot may link earlier browsing activity to a contact through its tracking cookies. Hidden form fields only store the UTM values available when the form is submitted, so the workflow in this guide preserves that first captured set.
Fact: HubSpot’s Original & Latest Traffic Source and custom original-touch UTM properties show you different pictures. The native property shows the earliest source HubSpot identified, while the custom fields preserve the first raw campaign values captured by your form setup.
What you need before building the attribution workflow
Before you build the automated workflow, make sure HubSpot is already receiving the UTM values correctly. The automation can preserve existing data, but it cannot fix a broken form or tracking setup.
You should already have:
The five contact properties utm_source, utm_medium, utm_campaign, utm_term and utm_content
Those properties are added to every relevant HubSpot form as hidden fields
URL parameters that match the property internal names exactly
A successful live form test showing the values on the contact record
Access to HubSpot workflows
Permission to create properties and edit workflow actions
The first step is to capture UTM parameters for HubSpot contacts using query string values and hidden form fields. HubSpot can pre-populate those fields when the parameter name matches the property’s internal name.
Note: HubSpot workflows require a Professional or Enterprise subscription in a supported Hub. Check your account before planning this automated setup.
Preventing UTM data from being overwritten (first touch vs latest touch)
Once you start storing raw UTM values on contact records, one important limitation appears: the same properties will usually keep updating when a contact submits another form with new UTM parameters. That means your main utm_source, utm_medium, utm_campaign, utm_term, and utm_content fields will normally reflect the latest touch, not the original one.
That can be useful, but it can also hide the first campaign that brought the person in. Someone might first arrive through Google Ads, then come back through an email or direct visit before submitting another form.
Create a second set of original-touch UTM properties
To preserve the first known campaign values, create a second set of contact properties for original-touch attribution:
utm_source_original
utm_medium_original
utm_campaign_original
utm_term_original
utm_content_original
Keep these as single-line text contact properties, just like the main UTM fields. The difference is that you should not add these _original fields to your forms.

Creating a HubSpot contact property to store the original UTM source value.
These fields are only there to store the first captured values. Your main UTM fields can keep changing, while the original-touch fields stay protected.
Build a workflow that copies the first UTM values once
In HubSpot, go to Automation > Workflows and create a new contact-based workflow. Choose a blank workflow so you can control the trigger and copy actions yourself.
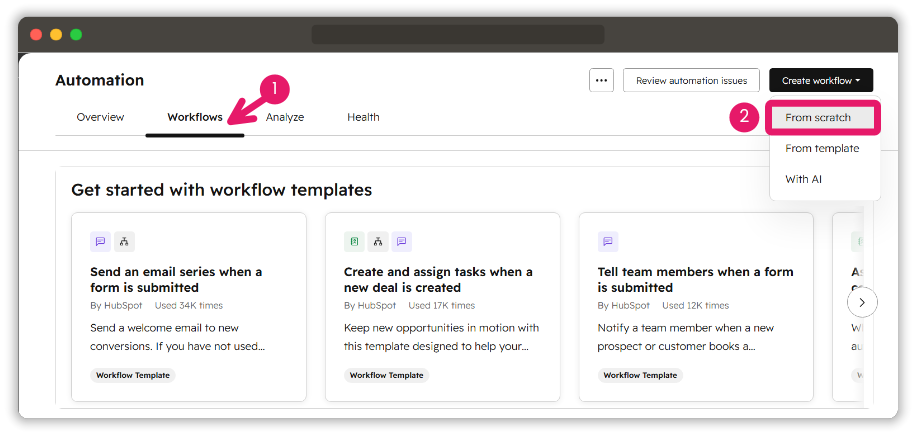
HubSpot Workflows screen showing how to create a workflow from scratch.
In the trigger builder, choose Property value changed from the Data values dropdown.
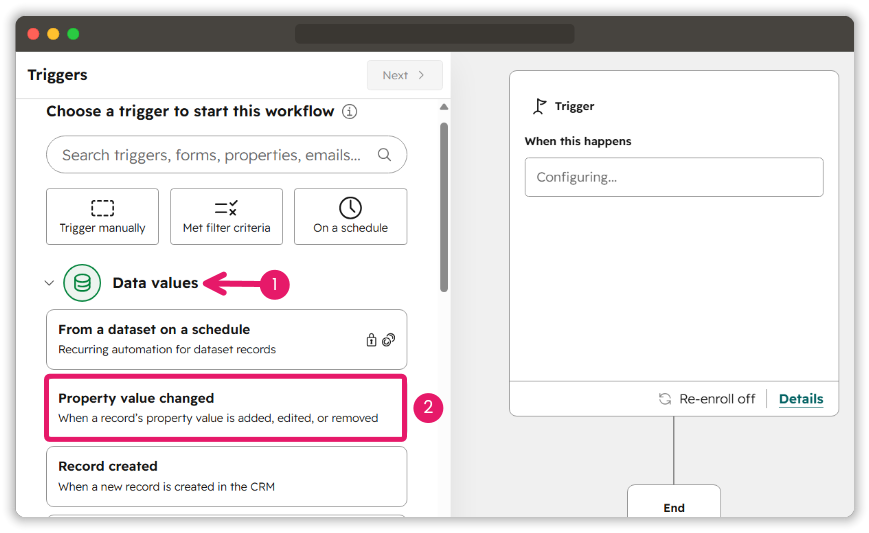
Selecting Property value changed as the HubSpot workflow trigger for UTM source capture.
And then choose One property value changed as the property trigger in the next window.

Configuring a HubSpot workflow to start when a single property value changes.
When prompted to choose an object, select Contact.

HubSpot workflow trigger setup showing Contact selected as the object.
In the next window, search for and select UTM Source as the property.

Configuring a HubSpot workflow trigger based on the UTM Source contact property.
If you follow the steps above, it’ll configure the trigger so the contact enrols when the new value for UTM Source is known.
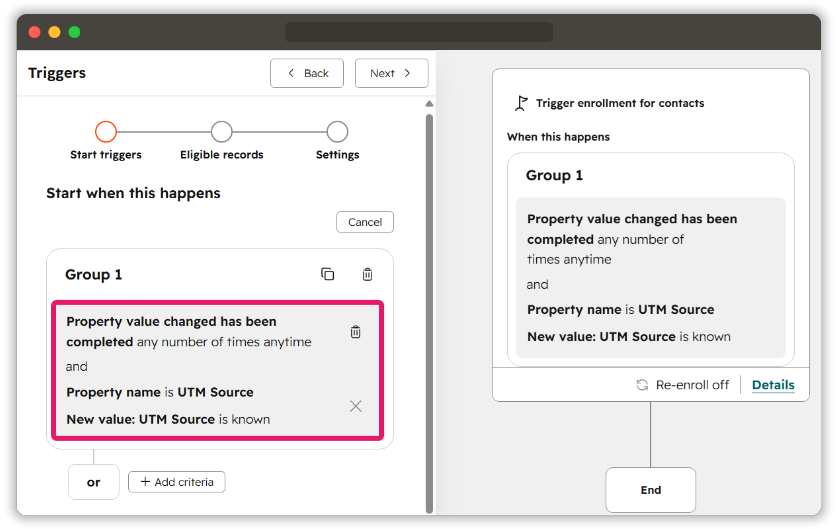
HubSpot workflow trigger summary showing enrolment when UTM Source is known.
Click Next. On the Eligible records step, leave the optional conditions blank unless you want to narrow the workflow further.
Continue to the Settings step and keep the Re-enroll toggle button off. This is important because you want the workflow to run only the first time the contact gets a UTM source value. Then, click the Save and continue button to save the trigger.

HubSpot workflow settings showing re-enrolment turned off before saving the trigger.
After the trigger is saved, we need to add the actions that copy the values. In the action list, search for Edit record, and select it from under the CRM section.
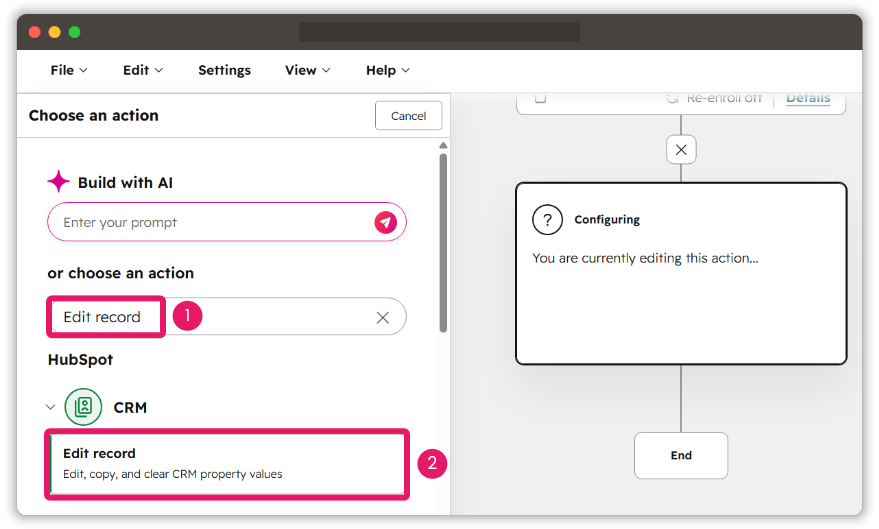
HubSpot workflow action list showing Edit record selected under CRM.
In the next window, keep the Record type as Contact. For the first action, choose UTM Source Original as the property to edit. Then choose Replace as the Change type. Now search for UTM Source inside the Choose a value option and select it as the source property.
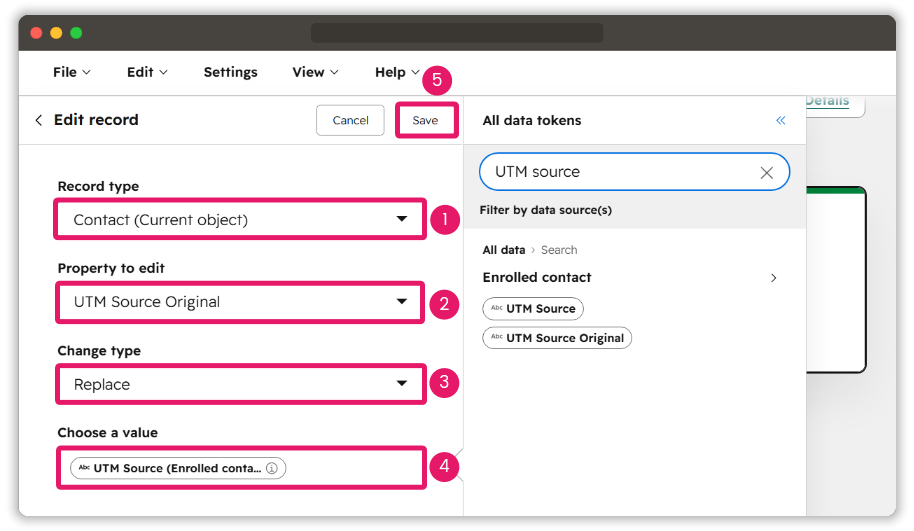
Configuring a HubSpot workflow action to replace UTM Source Original with UTM Source.
Repeat the same process four more times:
Copy UTM Medium into UTM Medium Original
Copy UTM Campaign into UTM Campaign Original
Copy UTM Term into UTM Term Original
Copy UTM Content into UTM Content Original
Review the workflow to make sure it contains five separate Edit record actions, one for each pair of properties.
Now give the workflow a descriptive name, such as “Archive original UTM values,” and then turn it on.

HubSpot workflow review screen for turning on the original UTM archive automation.
The result: original-touch preserved, latest-touch still updates
With this setup in place, your main UTM properties continue to work as the latest-touch fields. They can keep updating whenever a contact submits a later form with new campaign parameters. The _original properties, however, preserve the first set of values that mattered at the moment of first conversion.
This gives you both views of attribution:
The current/latest campaign context in the main UTM fields
The first known/original campaign context in the archive fields
That separation makes reporting and segmentation much easier later, especially when you want to compare the quality of the original source with later conversion paths.
Note: This workflow-based setup requires access to HubSpot workflows. If your HubSpot plan does not include workflows, you will not be able to automate this first-touch archive natively.
How to test first and latest touch attribution
Test the workflow with a fresh contact before relying on it for live reporting. You need to confirm two things: the main UTM fields can still update, and the original fields remain unchanged after the first capture.
Step 1: Submit a form using a first-touch test URL
Open a live landing page with a tagged URL for a Google paid-search campaign, then submit the form using a new test email address.
For example:
?utm_source=google&utm_medium=cpc&utm_campaign=q1_demo&utm_term=hubspot_attribution&utm_content=search_ad_1
Step 2: Check the main UTM properties.
Open the contact record and confirm that the main utm_source, utm_medium, utm_campaign, utm_term and utm_content fields contain the values from the test URL.
Step 3: Confirm that the workflow ran.
Check the workflow’s enrolment history to make sure the contact entered the workflow and reached each Edit record action.

Contact enrolment history for the HubSpot workflow used to preserve original UTM values.
Step 4: Check the original-touch fields.
Confirm that the matching _original properties now contain the same values as the main UTM fields.

HubSpot contact properties confirming that the workflow copied the first captured UTM values into the original fields.
Step 4: Submit a second form with different UTMs.
Use the same test email address, but visit the form through a different tagged URL, such as a LinkedIn paid-social campaign.
For example:
?utm_source=linkedin&utm_medium=paid_social&utm_campaign=q2_webinar&utm_content=carousel_ad
Step 5: Check the UTM properties again
The main UTM properties should now show the LinkedIn campaign values from the second submission. But the _original properties should still contain the Google campaign values from the first submission.
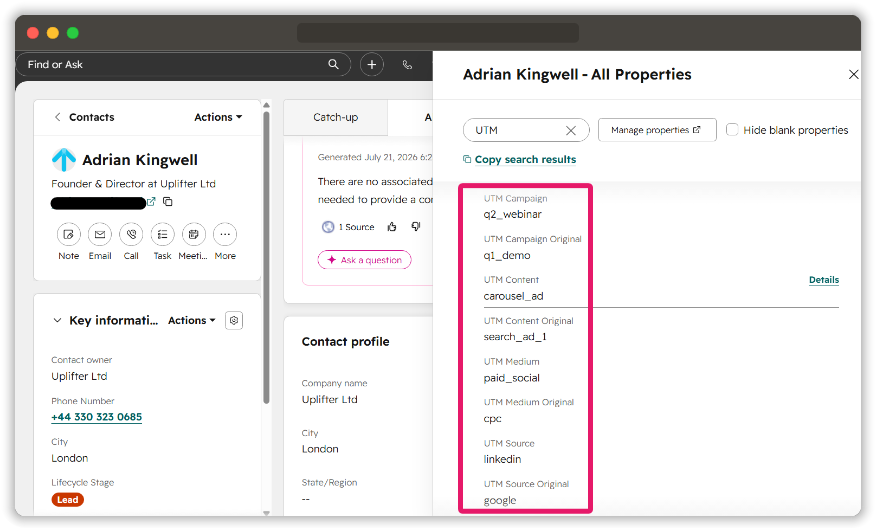
Latest and original UTM values are different
Note: If the _original UTM properties have also changed, check whether re-enrolment is enabled or whether another form or workflow is editing those fields.
Step 6: Review the property history.
Open the history for one main UTM property and its matching original property. This lets you check when each value changed, what changed it and whether the archive field was updated more than once.
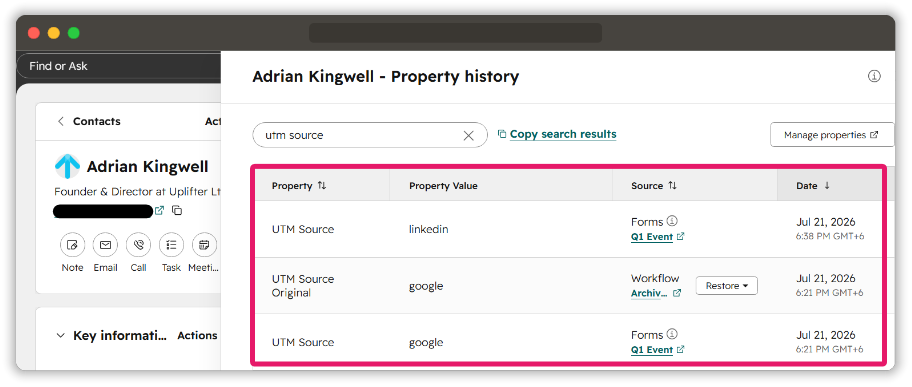
Property history for UTM Source and UTM Source Original.
HubSpot’s workflow test tool can show whether a contact meets the enrolment criteria and how it would move through the workflow. It does not run the actions, so use it as a preview rather than the final check.
A real form submission is still necessary. The contact record, property history and workflow enrolment history together will show whether the setup is preserving the first captured UTMs while allowing the latest values to update.
Stop managing UTMs in a spreadsheet!
Uplifter gives your team a centralised UTM builder with locked dropdowns, a shared taxonomy, and a full audit trail, so clean data is the default, not the goal.
Common first and latest touch attribution problems
Even a correctly built workflow can produce unexpected results if contacts re-enrol, source fields are blank, or older records enter the automation with existing data. These are the first places to check when the original and latest-touch values do not behave as expected.
The original fields keep changing
This usually means the contact is re-enrolling in the workflow. Check that re-enrolment is switched off, then review any forms, imports, or other workflows that can edit the _original properties.
Those fields should only be written once. They should not appear on live forms or be used as the destination in any later automation.
Some original fields remain blank
Not every campaign link uses all five UTM parameters. utm_term is often limited to paid search, while utm_content may only be added when the team wants to distinguish creatives or links.
Check whether the main property had a value when the workflow ran. For optional fields, add conditional branches so HubSpot skips the copy action when the source field is empty.
Existing contacts have the wrong first-touch value
This can happen when all qualifying contacts are enrolled as soon as the workflow goes live. Their current UTM values are then copied into fields labelled as original, even though those values may come from a later interaction.
Use property history to recover earlier values where possible. Once the data is corrected, restrict the workflow to contacts that qualify after activation.
Original Traffic Source does not match the original UTM fields
The two values do not have to match. HubSpot’s Original Traffic Source may reflect an earlier anonymous visit that HubSpot later linked to the contact, while the custom field reflects the first UTM value captured during a form submission.
Treat them as separate attribution views. The native property shows HubSpot’s earliest known source, while the custom field shows the first raw campaign value stored by your form setup.
The contact never entered the workflow
Start by checking whether the UTM Source or any other UTM values received a value. Then confirm that the contact had not already completed the workflow, that the correct version was active, and that existing contacts were included or excluded deliberately when it was switched on.
Also, review the workflow’s enrollment history and action history to see whether the contact failed the trigger, skipped an action, or had already completed the workflow.
How to use first- and latest-touch UTM data
Once both sets of properties are in place, you can compare the campaign that first brought a contact into your database with the campaign linked to their latest conversion. This gives marketing and sales teams more context than relying on one field that keeps changing.
You can use the data to:
Compare first-touch campaigns with later conversion campaigns
Segment contacts by original source and latest campaign
Compare lead quality across first-touch sources
Copy a fixed UTM value to a deal when an opportunity is created
Build reports using both the main and _original properties
These fields can support contact, deal, and revenue analysis, but each reporting view answers a different question. When you view UTM data in HubSpot reports, keep contact-level values separate from session-level traffic and attribution reporting.
Keep both attribution views consistent
Keeping original- and latest-touch values only helps when both follow the same taxonomy. Variations such as LinkedIn, linkedin, and linkedin_paid will still split your reports, even when they refer to the same source.
Must document the casing, separators, source values, medium values, and campaign formats your team should use before links are published. A shared UTM naming convention gives everyone the same rules to follow.
How Uplifter solves this: Uplifter’s free UTM builder helps create consistently structured links for one-off campaigns. When several marketers or agencies are building links, the UTM management tool provides a shared place to apply naming rules and manage campaign URLs.
Uplifter governs how campaign links are created before the values reach HubSpot. HubSpot remains responsible for form capture, workflow automation, contact properties, and attribution reporting.
Free download: UTM governance checklist
33 expert-backed steps to clean UTM data, including the exact spreadsheet structure and the governance layer that makes it work.
Ready to replace your spreadsheet?
Uplifter gives your team a governed UTM builder with locked dropdowns, a shared taxonomy, and a full audit trail. Set up in minutes, not months.
Try Uplifter