
How to create and track UTM parameters in HubSpot
What HubSpot actually captures from UTM parameters (and what it doesn't)
HubSpot can read UTM parameters when someone visits a page with the HubSpot tracking code installed. But that does not mean it stores every raw UTM value on the contact record.
By default, HubSpot uses traffic-source properties such as Original Traffic Source and Latest Traffic Source. These help HubSpot classify where a contact first came from and where their most recent visit came from.
That is useful for broad reporting. You can see whether contacts came from paid social, email marketing, organic search, direct traffic, referrals, other campaigns, offline sources, or AI referrals.
The problem is that these are still broad buckets. They do not give your team clean, editable fields for the exact campaign, ad, keyword, or email link that created the lead.
HubSpot also includes drill-down fields that add more context to traffic sources. These can include details such as a campaign name, email name, referring URL, or ad campaign, depending on the source.
But drill-down fields are controlled by HubSpot. They are not the same as having your own utm_source, utm_medium, utm_campaign, utm_term, and utm_content properties on a contact.
Note: HubSpot’s Tracking URL Builder creates tagged links for reporting. It does not create custom UTM properties, add them to forms, or guarantee that raw UTM values are stored on contact records.
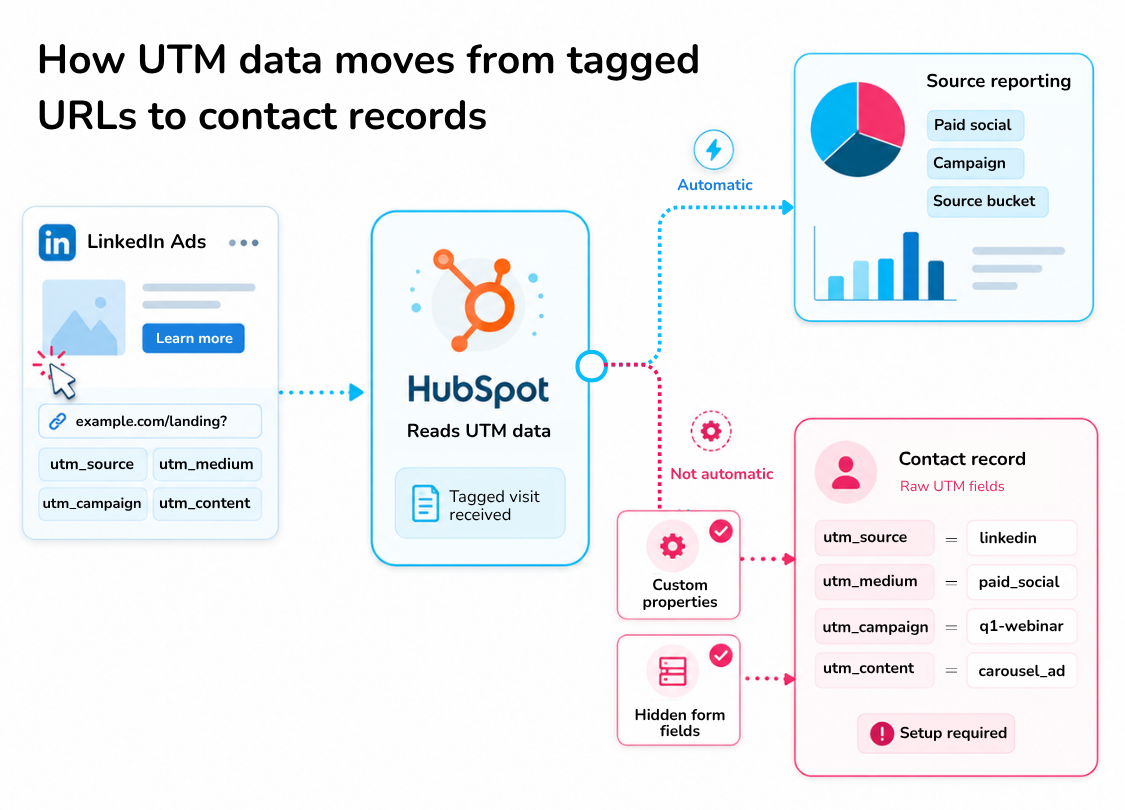
How UTM parameters get stored from tagged URLs to contact records
If you want raw UTM values on contact records, you need a separate capture setup. That usually means creating custom contact properties and adding them to HubSpot forms as hidden fields.
So think of HubSpot UTM tracking in four parts:
Traffic-source reporting: how HubSpot classifies visits
Tracking URL Builder: how HubSpot helps create tagged links
Custom contact properties: where raw UTM values can be stored
Hidden form fields: how those values get passed into the contact record
Once you separate those four pieces, planning HubSpot UTM tracking becomes much easier. You can use HubSpot’s native source properties for broad channel reporting, while using custom UTM fields for the campaign-level detail your marketing and sales teams actually need.
What you need before setting up UTM tracking in HubSpot
Before creating properties or editing forms, check that HubSpot can see the pages where people convert. The HubSpot tracking code should be installed on your landing pages, especially if the page sits outside HubSpot.
You also need permission to create contact properties and edit forms. Without that, you will need help from a HubSpot admin.
Next, decide how you will create UTM-tagged links. HubSpot’s Tracking URL Builder can create tagged URLs inside the platform, but it is not available on every plan. For one-off links outside HubSpot, you can also use Uplifter’s free UTM builder.
You should also decide what attribution data you want to keep. Some teams only need the latest conversion UTMs, while others need original-touch fields, latest-touch fields, and deal-level attribution.
Note: The core setup using custom properties and hidden form fields can work without HubSpot’s Tracking URL Builder. But HubSpot’s native Tracking URL Builder and workflows are plan-gated, so check your subscription before planning the full setup.
How to capture UTM parameters on HubSpot contacts
If you want raw UTM values stored directly on HubSpot contact records, you need to create your own capture setup. HubSpot’s native traffic-source properties are useful for attribution reporting, but they do not give you editable contact fields for every UTM parameter.
The usual setup is simple: create custom contact properties, build tagged links, add the properties to your forms as hidden fields, then test the full journey.
Step 1: Create the UTM contact properties
If you want HubSpot to store raw UTM values on the contact record, you first need somewhere for those values to go. The UTM parameters live in the URL, the contact properties store the values, and the form passes the values into HubSpot.

How website forms pass URL parameters into HubSpot contact properties
Create the five standard UTM properties
Create these as single-line text contact properties:
utm_source
utm_medium
utm_campaign
utm_term
utm_content
The internal name is the part that matters most. The label is what you see in HubSpot, but the internal name is what HubSpot uses to match a URL parameter to the right property.
For example, if the internal name is utm_source, your URL must use:
?utm_source=linkedin
If the internal name were utm_source_paid, the URL would need to use:
?utm_source_paid=linkedin
For a standard setup, keep the internal names exactly the same as the UTM parameters. Use lowercase, underscores and no spaces.
Use these exact property values
You can use the same value for both the label and internal name. But cleaner labels are easier for most teams to read inside HubSpot, as long as the internal names stay exact. You can use this table while creating them:
| Property label | Internal name | Field type |
|---|---|---|
| UTM Source | utm_source | Single-line text |
| UTM Medium | utm_medium | Single-line text |
| UTM Campaign | utm_campaign | Single-line text |
| UTM Term | utm_term | Single-line text |
| UTM Content | utm_content | Single-line text |
Single-line text is the safest field type because UTM values arrive as plain text from the URL. Examples include linkedin, paid_social, q1_webinar or retargeting_ad_2.
Create the properties in HubSpot
Log in to HubSpot and click the gear icon in the top navigation to open Settings. Under Data Management, click Properties.
Make sure Contact properties is selected in the object dropdown. Then click Create property.
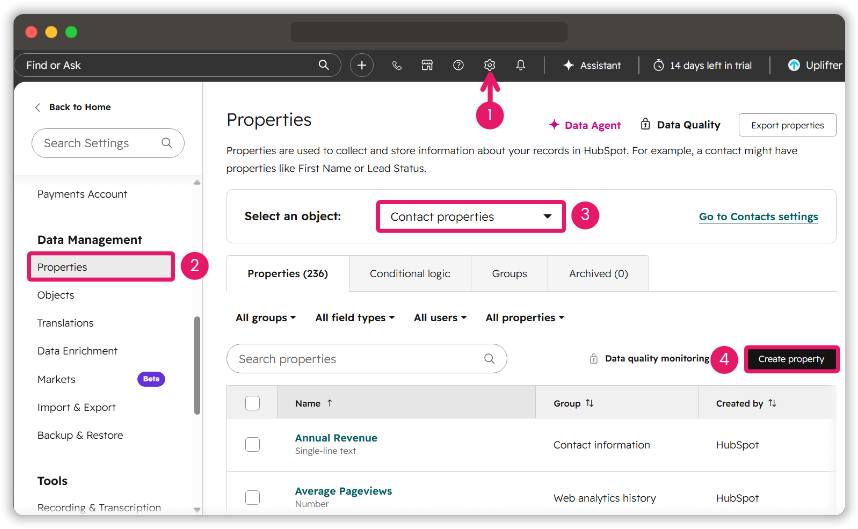
HubSpot Properties page showing where to create new contact properties for UTM tracking.
In the property creation window, add the first property details:
Label: UTM Source
Internal name: utm_source
Field type: Single-line text
Then click Create property.

HubSpot property setup screen showing the label, internal name and field type for a UTM contact property.
Repeat the same process for utm_medium, utm_campaign, utm_term and utm_content. Once these properties exist, you can create UTM-tagged links and pass those values into HubSpot through hidden form fields.
Step 2: Create UTM-tagged links
Now that your contact properties are ready, create the links that will pass campaign data into HubSpot. You can build these manually, use HubSpot’s Tracking URL Builder, or use a UTM builder outside HubSpot.
A webinar link for LinkedIn ads could look like this:
https://yoursite.com/webinar?utm_source=linkedin&utm_medium=paid_social&utm_campaign=q1-webinar&utm_content=carousel_ad
Must keep in mind that the parameter names in the URL must match the internal names of the form fields you want HubSpot to populate.
How to create a tracking URL in HubSpot
In order to create a tracking URL in HubSpot, click the settings gear in the top navigation. Then go to Tracking & Analytics > Tracking URLs.
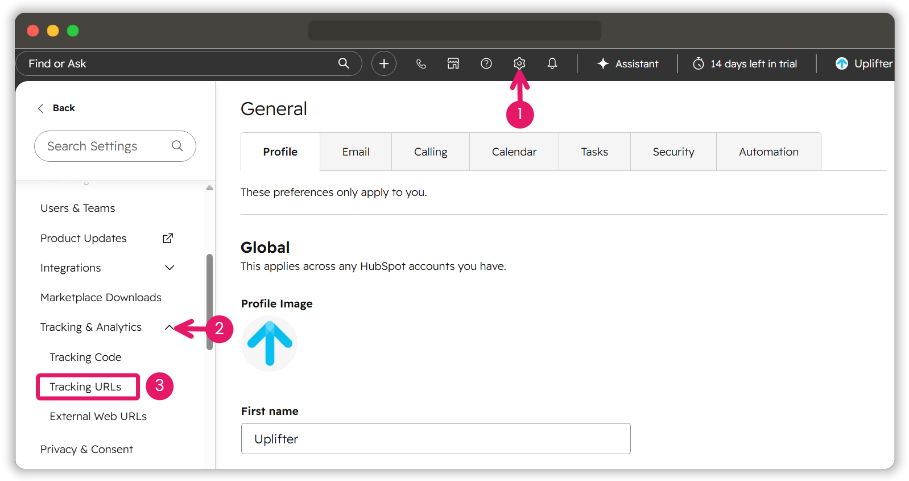
Navigating to HubSpot Tracking URLs from the settings menu to create UTM tracking links.
From the Tracking URL Builder page, click Create tracking URL. You will need marketing reporting permissions to create tracking URLs.
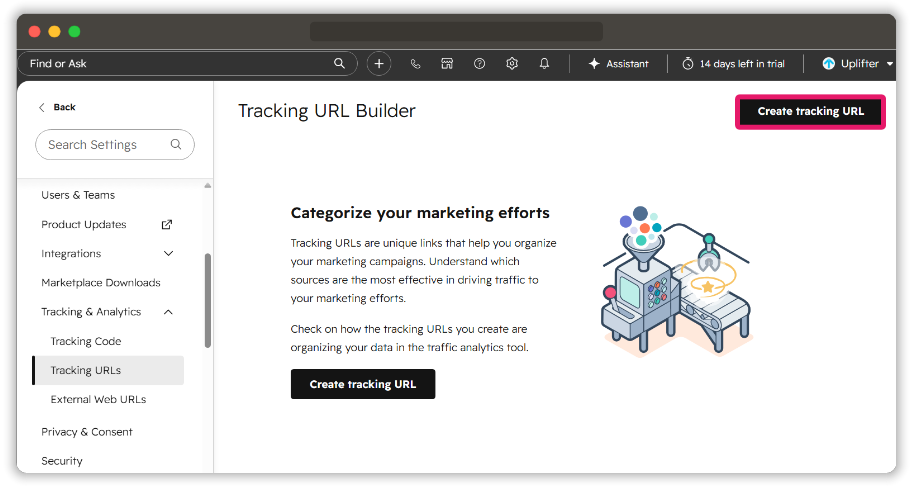
HubSpot Tracking URL Builder screen showing where to start creating a new tracking URL.
In the create panel, enter the destination URL and choose the correct protocol, such as https://. The destination should be a page where the HubSpot tracking code is installed.
Next, select the UTM campaign. HubSpot requires this because visits from the tracking URL are attributed to that campaign in reporting.
Then choose the Source, such as email marketing, paid search, organic social, paid social, or Other campaigns. If you select Other campaigns, you can enter a custom UTM source value.
You can also fill in optional fields such as UTM Medium, UTM Term, and UTM Content. Use these to define the channel, paid keyword, or creative variation.
Click Create when the fields are ready. If you want to make another tracking URL straight away, click Create and add another.

HubSpot tracking URL form showing the required fields used to create a UTM-tagged campaign link.
After creating the link, return to the Tracking URLs page. You can now get the short URL by clicking the Copy short URL button, but if you want the full tracking URL, then open Actions dropdown and click the Copy tracking URL option.

Copying a HubSpot tracking URL from the Actions menu after creating a campaign link.
Be consistent with your UTM values. For this setup, consistency matters twice: first for HubSpot reporting, and second because your form capture depends on the final landing-page URL carrying the exact parameter names and values you expect.
Note: This is where manual link building often breaks down. For teams creating and managing multiple links, Uplifter’s UTM management tool helps keep approved values and campaign links in one place.
Uplifter helps you create and manage consistent campaign links. HubSpot is still the system that captures those values through tracking, forms, and contact properties.
Stop managing UTMs in a spreadsheet!
Uplifter gives your team a centralised UTM builder with locked dropdowns, a shared taxonomy, and a full audit trail, so clean data is the default, not the goal.
Step 3: Add the UTM properties to your HubSpot form as hidden fields
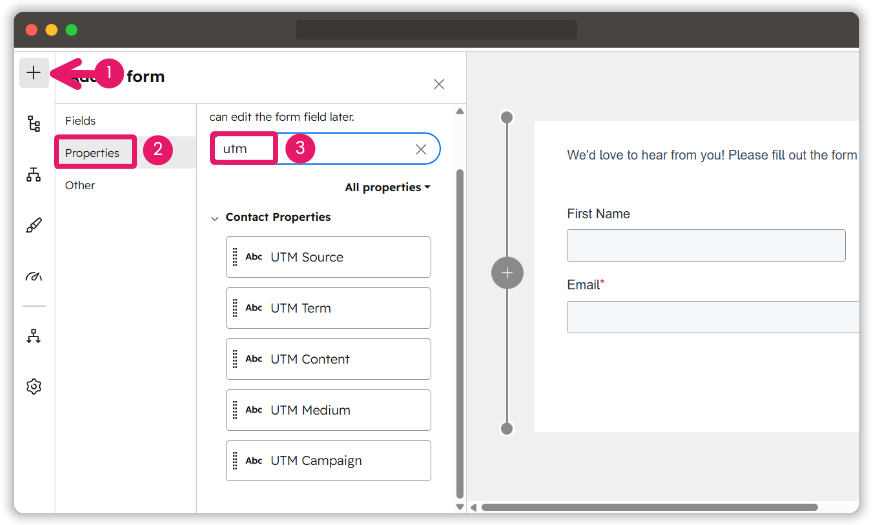
Open the HubSpot form editor and add each UTM property to the form. Click the + icon, choose Properties, then search for utm to find the five contact properties you created.

HubSpot form editor search results showing UTM properties ready to add as form fields.
Add each UTM property as a field in the form. Once the fields are in place, edit each one and turn on the Hidden field option.
HubSpot form setup showing UTM properties added to the form and configured as hidden fields.
Repeat this for every form where you want UTM capture. This is not a global setting, so adding the fields to one form does not add them to every form on your site.
The UTM parameters must be present in the page URL so HubSpot can use them to pre-populate the form fields. Hidden fields can also have default values, but use these carefully because they may affect what is passed into the contact property.
Note: A field cannot be both required and hidden in HubSpot. If you cannot hide a UTM field, check that the field is not marked as required.
Step 4: Test before you go live
Test the setup on a live page with a real tagged URL. This is better than relying only on the form preview because you need to check the full page URL, form load, and contact update.
Use a simple test string such as:
?utm_source=linkedin&utm_medium=paid_social&utm_campaign=q1-webinar&utm_content=carousel_ad
Submit the form with a unique test email, then open the new or updated contact record in HubSpot. Check that the UTM properties are populated, the values match the URL exactly, and the data appears on the contact record, not only in the form submission.

HubSpot contact properties panel showing captured UTM values from a test campaign link.
Also, check any related reporting after testing. Contact property values from the form submission should update on the record, while traffic-source reporting can take additional processing time.
Where UTM capture can fail
UTM capture often fails when the parameters are no longer present in the page URL by the time the form loads. This can happen after redirects, CTA-to-form journeys, or multi-page paths where the original query string is not carried through.
Cookie consent tools, ad blockers, or blocked tracking scripts can also prevent HubSpot from associating earlier anonymous visits with the contact. That can affect traffic-source attribution even if the form itself submits successfully.
If you are using non-HubSpot forms, check HubSpot’s limitations carefully. HubSpot documents that single-page apps are not supported for non-HubSpot forms, and hidden fields are not collected by the non-HubSpot forms tool.
The safest approach is to test the real user journey. Start from the ad, email, or social link, follow every redirect and CTA click, submit the form, then check the contact record in HubSpot.
How HubSpot handles UTMs in marketing emails
HubSpot can append source tracking tags to links in marketing emails. The result depends on how source tracking is configured: HubSpot can add its own parameters, preserve tags already on the URL, or leave the link unchanged.
Teams that create custom UTMs should use the option that keeps existing tags in place. Otherwise, HubSpot may replace them with its default email values, which can make campaign names inconsistent across HubSpot, GA4, and other reports.
Campaign UTM values help HubSpot connect email clicks and website activity with a campaign. They support email and campaign reporting, but they do not automatically fill custom contact properties such as utm_source, utm_medium, or utm_campaign.
Understanding how UTM tracking works in HubSpot marketing emails helps you choose the right source tracking and campaign settings before you send. Storing those values in contact records still requires the separate custom property and hidden field setup.
Keeping first and latest-touch UTM values in HubSpot
When a contact submits another form with new campaign parameters, the main UTM properties can be updated. Fields such as utm_source, utm_medium, and utm_campaign will then show the latest captured campaign, which can erase the original conversion context.
A practical way to get first- and latest-touch UTM attribution in HubSpot is to keep the main fields for the latest values and create a second set of protected properties, such as utm_source_original, utm_medium_original, and utm_campaign_original.
Then, you need to create a contact-based workflow that copies the first available UTM values into the _original fields once. You must keep the re-enrolment option off for the workflow so that later form submissions can update the main fields without replacing the archived values.
This setup tracks the first and latest UTMs captured through your forms. It is separate from HubSpot’s native Original Traffic Source, which uses HubSpot’s own source categories and may reflect an earlier anonymous website visit.
Where to view UTM data in HubSpot
HubSpot shows UTM data in several places, and each view answers a different question. A contact report uses the values stored in CRM properties such as utm_source, utm_medium, and utm_campaign, so it is the best option for analysing which campaigns created or converted contacts.
Web traffic analysis looks at sessions from tagged URLs rather than values saved on contact records. Use it to review visits, engagement, and conversion behaviour by campaign, source or medium.
Choosing the right view matters because UTM data in HubSpot reports is grouped differently at contact, session, campaign, and attribution levels. A figure from one report should not be treated as a direct replacement for another.
HubSpot and GA4 may also show different totals from the same tagged links. The platforms use different session rules, identity methods, and attribution logic, so use HubSpot for CRM-connected outcomes and GA4 for broader acquisition and website behaviour.
Common UTM tracking mistakes in HubSpot
Most HubSpot UTM problems come from small setup details, not from HubSpot itself. If the links, forms, or values are inconsistent before the data reaches the CRM, your reports will reflect that.
Creating UTM properties but not adding them to forms
Contact properties do not populate themselves. If you want HubSpot to capture utm_source, utm_medium, or utm_campaign on form submission, those properties need to be added to each relevant form as hidden fields.
Using the wrong internal property names
The query string parameter has to match the contact property’s internal name exactly. If your property is utm_source, the URL must use utm_source, not UTM Source, UTM_Source or utmSource.
Adding hidden fields to only one form
HubSpot forms do not share hidden UTM fields automatically. If your site has several lead capture forms, each one needs to be checked and updated individually.
Testing only in the form preview
The HubSpot form preview is useful for checking the layout, but it does not replace a live UTM test. Open the live page with a real UTM-tagged URL, submit the form, then check whether the values appear on the contact record.
Letting redirects remove UTM parameters
A campaign link can look correct when you build it, but still fail after redirects, shortened URLs, or page jumps. Test the final landing page URL after everything loads and make sure the UTM parameters are still present when the form is submitted.
Using inconsistent naming conventions
Values like Google, google, google_ads and Google Ads can fragment your reports because they are treated as different values. Set a clear UTM naming convention before campaigns go live and use it across every channel.
Assuming HubSpot email UTMs populate custom contact properties
HubSpot’s email tracking and campaign attribution are separate from the custom UTM properties you created on the contact record. If you want email campaign values stored in those custom fields, the visitor still needs to reach a form where your hidden-field setup can capture them.
Assuming Original Traffic Source replaces UTM tracking
Original Traffic Source is HubSpot’s own attribution property. It is useful for broad source reporting, but it is not the same as storing raw campaign values in your custom utm_source, utm_medium, and utm_campaign fields.
Adding UTMs to internal links
UTM tags are for inbound campaign links, not for clicks between pages on your own site. For internal click analysis, use event tracking or another on-site analytics method instead.
Putting personal data in UTM parameters
Never put names, email addresses, phone numbers, or other personal identifiers into UTM values. URLs can be copied, exported, and stored across tools, so they are not the right place for personal data.
Free download: UTM governance checklist
33 expert-backed steps to clean UTM data, including the exact spreadsheet structure and the governance layer that makes it work.
Ready to replace your spreadsheet?
Uplifter gives your team a governed UTM builder with locked dropdowns, a shared taxonomy, and a full audit trail. Set up in minutes, not months.
Try Uplifter